I get this question a lot – I have an external hard drive that is NTFS formatted (Windows format), and I want to reformat it for my Mac (HFS). How do I do that?
And you know what? It’s not nearly as easy as it should be!
There is one trick to it that is not intuitive.
So how DO you do it?
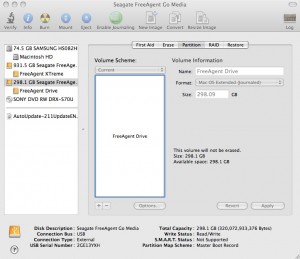 First… Plug the drive in to your Mac. Then open the Disk Utility that is located in the Utilities folder of your Applications folder. You will see your internal drive in your Mac, as well as any other storage devices that are connected. For this exercise, it is best to DISCONNECT any and all external storage devices, so you only have the one that you wish to format connected. That way you will protect yourself from inadvertently re-formatting the wrong drive. You must still be careful in your selection of which drive to format, as you certainly don’t want to format one of your internal drives.
When you see the drives listed down the right hand side of the Disk Utilities window, you will see at least two entries for each physical hard drive. The first is the physical drive itself. What appear underneath the physical drive are the individual partitions. Most drives are formatted into a single partition, so you will normally see only one entry underneath a physical drive entry. But that is not always the case, so don’t be surprised, or think there is something wrong, if you see more than one entry under a physical drive.
For the purpose of reformatting, you need to start by selecting the PHYSICAL drive that you wish to reformat. In my example here (shown in the pictures here), I will be reformatting the drive shown as ‘298.1 GB Seagate FreAge.’. You can see at the bottom of the first image that this drive is formatted as Windows NT File System (NTFS). We want it to be Mac HFS formatted.
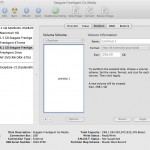 Once you have selected the PHYSICAL drive, then click on the Partition tab at the top of the window. You will then need to click on the down arrow under the heading ‘Volume Scheme’ to indicate how many partitions you wish this newly formatted drive to have. Again, the standard is one, and that is what is shown here in the images.
On a Mac, they system will automatically try to format any partition to Mac OS Extended (Journaled). You will see this indicated on the right hand side of the image, labeled ‘Format’. This can be changed if desired, but for this exercise this is exactly the format we want.
Now for the tricky part. When you start with a drive that has been formatted for a Windows system, there is another part that must be changed, and that can be found by clicking on the Options button located underneath the Partitions window. (Each partition can be named separately).
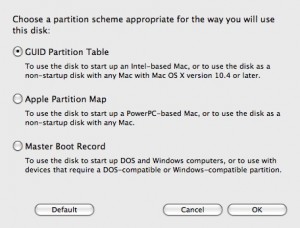 When you click on that Options button, you will see the screen shown here. Notice that this screen defaults to Master Boot Record – this is the existing Windows NTFS format that is on the drive. And this must be changed in order to successfully format this drive for a Mac.
There are two other options here – GUID Partition Table and Apple Partition Table. There are good descriptions here of which to use for what specific Mac product you wish to optimize this drive for. For most new formats, you will want to choose the top selection – GUID Partition Table. Once you select this, click the OK button, and you are now ready to actually partition and  format your drive.
After you hit Apply on the Partition Scheme window, you are returned to the prior window showing your devices. You might now want to change the name of the partition that you are about to create. Under the heading ‘Volume Information’ in the upper right, simply type in the name you would like to use in the Name field (it defaults to ‘Untitled-1’). There are some rules about naming, and the system will inform you as you enter the name. From here, click on Apply and the system will partition and format your drive for use with your Mac.
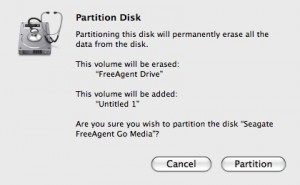 When you hit the Apply button, there will be one more screen for you to confirm that you indeed want to partition and format this drive, as it will remove any and all data that is on that drive. Please be sure you are formatting the right drive!
That’s really all there is to it. That one trick – the Options screen – is what usually catches people up when trying to change a drive from a Windows format to a Mac format.
Happy formatting!




So the only difference between the FreeAgent Go and the FreeAgent Go for Mac is the formatting? One is formatted NTFS and the other NFS out of the box, but in theory either would work on either platform if it was formatted correctly, right?
Chris – besides the formatting difference, there is software on the PC version and no software on the Mac version. Also, there are two versions of Mac products – FreeAgent Go Pro for Mac (has USB AND Firewire 800), and FreeAgent Go for Mac USB (USB 2.0 only). But yes – in theory, either would work on either platform as long as the format is correct for that platform.
I hope this helps. Please let me know if you have any other questions.
Jon
I do not have the right type of connection (wire) for my present computer (MacBook Pro) to connect with the Seagate External Hard drive. Therefore, Will try what is written above when I purchase the right wire for the connection. Thanks, Peter
Hello I have a windows laptop and have just bought an iMac desktop. I am going to buy a freeagent Go to back up my windows machine and thought I would need another (separate) drive for the Mac. However I see from the reviews that at least one person uses this model for his Macbook. Could this item be partitioned to store programs or files under windows and Mac OS separately, and if so, how? Thanks
Ian,
Great question. Yes, you could indeed partition your new FreeAgent Go to have both an NTFS partition AND an HRS partition. This is not a typical solution, but it can be done. I would recommend you create the partitions on the Mac, and set the one that you will eventually want as NTFS as FAT (so you can then reformat that on your PC). Please be aware though – your PC will never be able to see the HFS partition. The Mac will be able to see and read from the NTFS partition, but not write to it.
I hope this helps!
Hi Jon,
Thank for this. I just bought a Seagate Expansion drive and couldn’t figure out why it wouldn’t let me format it. Once I changed the options to GUID it worked perfectly! Fantastic. Really appreciate this article. Thank you 🙂
Hi, not sure if this is possible but i cannot find a post above on how to actually remove what is already on the Seagate External Hard drive ( Windows) then reformat it to a (Mac).
Can you please help me with some advice.
Thankyou.
Hi there, I have and had Windows based PCs and laptops since.. long time. Now I just had enough and wish to change to Mac. I wish it would be as easy to just buy a new machine and done but I want my TB worth of photos and other file to be transfered safely. I have purchased a Freagent Go USB 2.0 and been told that Mac will see this even though its been formated to NTFS. I had my doubts but anyway I have it now and wish to transfer data. Obviously the above mentioned re-formating won’t help as it would erase all my datad from the drive, but can any1 tell me, what would be the best solution, without writing 100s of DVDs or aven Blu-Rays if that would be an option at all. Thanks T.
I have a Macbook Pro and I had downloaded something to my desktop that was free and didn’t have a day limit, or trial. Then my school had a mandatory reformatting for our macs and I lost what I had downloaded and the bookmark. Now I can’t find anything like it. I can’t reformat the Seagate FreeAgent Drive Go, because I have important files on the Drive. I can’t afford to lose them. Help? Please?
Hi Jon,
I recently bought a 320GB Seagate free agent, which I bought specifically to work on my PC laptop and Mac. The sales assistant assured me that it worked for both!
While at uni I use a Mac and it crashed!..making all my files read only. A friend re formatted on his Mac book pro, (big mistake) as I am now missing the NTFS formatting which I’m guessing I need to work on my PC laptop.
I read that if I use over 4GB on the free agent using a Mac that it’s likly to crash!…so now I can use if for my mac, but can’t sync files from my PC laptop.
Can you help me show the reverse of this article, (need a NTFS partition)? Thank you : )
Thank god for you man. this was really helpful and has saved me £50,00 thnks again
You are my hero, i bought the 2TB, and when i looked at th box it said for pc. It was really easy to switch. I was going to buy a firewire to transfer everything but know i dont. Thanks alot
thanks thats really good, really good that you put the info up !
Thanks for posting the great instructions re partitioning the Go Flex hard drive for Macs
Just one thing though when I get to the final part of confirming I want to partition and clicking OK it says it cannot Unmount disk! Can you please help since I thought this product was plug and play. It certainly is not that for Mac newbies:-(
OMG thankk you !!! I thought i was gonna have to donate this pretty looking external hd the only one i found that matched my Macbook !! =D .. Thanks !!!!
Thanks for a straight-forward and Plain English description… so many others could learn from you.
Just on point I would stress. It’ when you get Partitions up. At the first stage, ‘Options’ is greyed out (this also happened before I found your post) and this caused me problems. But on carefully reading your instructions again I realised I had to specify the number of partitions (in my case 1) and hey presto, up came Options.
Thanks again.
Thank you so much for this. Couldn’t figure out what I was doing wrong. You rock.
Thanks for the simple instructions, I was getting a bit worries when I kept getting the error message about failing to format the drive. Nice work! Cheers 🙂
Hi,
If i reformat my WWindows Disk Drive for a Mac does that mean i lose all the information that is already stored on it? James
Thanks a lot! You’ve helped me solve a problem with easy and concise instructions, now I don’t have to return this hard drive that I purchased six weeks ago. Thanks again.
Great explanation. Worked like a charm. Thanks.
Thank you SO much Jon! Your instructions were very easy to follow and I was able to reformat my Segate Expansion to work with my MacBook Pro within minutes. Thank you, Thank You, Thank You!!!
Excellent. I thought I had wasted my money but this post saved the day. Thank you!!
THANK YOU!
best information! i was just about to return the hard drive, but you saved me! thanks 😀
-c-
Thank you so much! The Seagate website does not have such great instructions! 🙂
Hey. Just got done with this. Thanks for taking time to post this.
Thank you!! Really appreciate the clear instructions. Made the whole process a lot less intense.
I’ll add my voice to the chorus of thanks! I bought one drive, tried to format/erase/initialize or just use the thing, and managed to mess up the directory (I think) to the point where it wouldn’t show up on a Windows computer either. I took it back to the store (hey, Fry’s – that drive might be OK after all) and got another one – since it behaved the same as the first, I made sure not to do anything to it until I tried your method. It’s now formatted, and happily swallowing all the backup data I’m dumping on it! Thanks again!
Thank you soooo much for this tutorial! I was about to send these two hard drives back because the other directions I found were too complicated. I appreciate you!
This article helped me so much. Thanks!
Thanks for this article, it really did help, i was totally lost before! 🙂
excellent and succinct instructions
Thank you! Feliz Natal!
This was really helpful, but when I click the “Apply” button, I get an error drop down that says “Partition failed with the error: couldn’t unmount disk.”
Any idea how to unmount the disk so that I can format it for my Mac? Thanks very much!!
You are a genius! Thank you so much for this!
Thank you, thank you, THANK YOU!!!!!
Excellant instructions.
[…] Leopard, Snow Leopard, or Lion, which is quite straightforward, simply follow these instructions: http://blog.seagate.com/consumer/how-to-format-a-windows-disk-drive-for-a-m… Also, an important thing to mention is that for USB 3.0 speeds to work you must have a motherboard […]
[…] On the back of the Seagate Expansion you will find a power input and a USB 3.0 jack. Using this hard drive is very simple on Windows operating systems – You merely plug in the power cord and USB 3.0 lead and off you go, this is thanks to the fact that the hard drive comes pre-setup to use for Windows users. If you want to use the Seagate Expansion on a mac, you only need to reformat it using the Disk Utility in your Mac operating system and voila. If you don’t know how to do this, take a look at the following Seagate page and follow their easy to follow steps: http://blog.seagate.com/consumer/how-to-format-a-windows-disk-drive-for-a-m… […]
This worked a treat for me. There were a couple of the screens that were different to the examples shown probably due to mac updates since this was posted, but it was still easy enough to follow. Thanks for your help.