Removing the drive from a Windows Computer :
Disconnecting or "safe removal" of an external drive from your PC is handled by the Windows Safely Remove program. The following are the steps necessary to safely remove an external drive from your Windows computer:
Note: Failure to follow this procedure may result in data loss to an external drive.
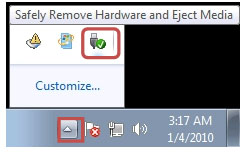
- Double-click on the Safely Remove icon in your Windows System Tray. This will launch the Safely Remove program.
Note: In Windows this icon can sometimes be hidden. Simply click on the up arrow and proceed.

- The Safely Remove window will display any/all detected USB/FireWire devices connected to your Windows computer. If necessary click/check the Display device components box to expand the view.
- Click on the device (e.g., external drive) you wish to remove and click on the Stop button.
- A confirmation window will appear. Once again, select the device you wish to remove and click on the OK button.
- A pop-up window displays notifying you that it is now safe to remove the device. You can either close the pop-up window or it will close by itself. You can now power down/disconnect your external drive from your computer.
Note: At times while Safely Removing an external drive, Windows may show a warning that the external drive is busy and cannot be disconnected. If this occurs:
- Try again to Safely Remove the device
- Shut down your computer and then disconnect the external drive
Removing the drive from a Mac Computer :
In Mac OS the drive appears as an icon on the desktop. Before unplugging the drive, it needs to be dismounted by dragging the drive to the Trash Can.
Wait a few seconds after the drive has gone into the Trash Can; once the activity light has gone out, you can safely remove the drive. Once the drive is turned off, disconnect the interface cable.


