Heeft deze informatie u geholpen?
Hoe kunnen we dit artikel nog verbeteren?
Administrator's Guide - Introduction
This guide provides instructions on creating buckets and managing bucket permissions and service accounts to authenticate and access data stored in the buckets. It describes identity and access management (IAM) to manage access to your Lyve Cloud resources. The Lyve Cloud console dashboard displays the storage system's overall statistics. See graphical views of usage trends, numerical values of buckets, and average usage.
Console high-level workflow
This section explains the console workflow as determined by user roles. For more information on your assigned role, see Administrator's Guide - Identity and Access Management (IAM).
There are three roles available in Lyve Cloud:
- Administrator
- Storage Administrator
- Auditor
Administrator workflow (admin role)
Administrators can perform all actions available in the Lyve Cloud console.
- Once you sign in to the Lyve Cloud console, a dashboard is displayed. The dashboard shows details of buckets and usage-related information. For more information, see Understanding the home page dashboard.
- To manage Lyve Cloud storage:
- Storage is managed and provisioned in buckets. For more information, see Creating buckets.
- Once you create a bucket, you must assign it Permissions, and define what operations are allowed for buckets. See Creating bucket access permissions.
- After you assign permissions to a bucket, create a service account. Service accounts are used by applications to authenticate API calls accessing the bucket. For more information, see Creating service accounts.
- Use Identity and Access Management (IAM) features to secure access to your Lyve Cloud account. For more information, see Administrator's Guide - Identity and Access Management (IAM).
Storage management workflow (storage admin role)
The storage admin user can perform all the storage operations as an Administrator user in Lyve Cloud, including managing buckets, managing permissions, and creating service accounts. The storage admin user is restricted from altering settings for Identity and Access Management (IAM) and Lyve Cloud account billing.
Auditor workflow
Users with the Auditor role have read only access throughout the Lyve Cloud console, and are not permitted to perform any storage operations or alter settings.
Console session management
The user login session management increases the strength and security of the Lyve Cloud session. To provide more secure access, non-persistent sessions invalidate a Lyve Cloud console session cookie when the browser is closed.
By default, a user session timeout is 24 hours. Users are not required to log in with their credentials for up to 24 hours only if the Lyve Cloud session is active. The session is active after successful authentication by the user. The Lyve Cloud console automatically signs out the user after 24 hours.
When users close and re-open the browser, they get a prompt for re-authentication.
In summary, the Lyve Cloud console requires re-authentication in the following cases:
- When you sign out of the Lyve Cloud session
- The browser is closed without any active session, or the active Lyve Cloud tab is closed.
- The authenticated session is more than 24 hours.
The Lyve Cloud console session remains active in the following cases:
- At least one Lyve Cloud active session is open, and the authentication session is less than 24 hours.
Supported browsers
The Lyve Cloud Console supports the following browsers:
| Browser | Version |
|---|---|
| Google Chrome | Last three versions |
| Mozilla Firefox | Last three versions |
| Microsoft Edge | Last three versions |
| Apple Safari | Last three versions |
Managing support tickets
If you experience a problem with Lyve Cloud, use the Support page to create a support ticket. Please provide detailed information in the Subject and Description fields, and attach any relevant references for the support team. Detailed information helps us provide a more efficient and effective resolution, as the ticket response time is based on its severity level which is determined from the details provided.
Each support ticket is assigned a unique number. Use this ticket number to track the progress of the reported issue, and update the support ticket by adding a comment. Comments and resolutions are recorded in each ticket.
You can also send an email to support.lyvecloud@seagate.com to report an issue. A support ticket is opened based on the issue reported in the email.
The support team reviews ticket details and updates the ticket status.
- New: This status is assigned immediately when a ticket is created, and work is not yet started.
- In Progress: This status indicates that the ticket is under review, and a support engineer is investigating the issue.
After the ticket is updated, you will receive an email notification containing the ticket number, subject, and changes made. You will receive an email notification when a new ticket is opened, a ticket is updated, or an issue is resolved and the ticket is closed.
The Support page lists the number of new and in progress tickets.
Role-based access for the support page
The following table describes access to the Support page features based on the admin role.
| Actions | Admin | Storage Admin | Auditor (Read only) |
|---|---|---|---|
| Create ticket | ✓ | ✓ | × |
| Edit ticket | ✓ | ✓ | × |
| View ticket | ✓ | ✓ | ✓ |
| Add Comments | ✓ | ✓ | × |
| View Comments | ✓ | ✓ | ✓ |
Video: How to contact Lyve Cloud Support
Seagate on Vimeo: Lyve Cloud - How to Contact Lyve Cloud Support
Creating a support ticket
To create a ticket:
- On the left-hand menu, select Support.
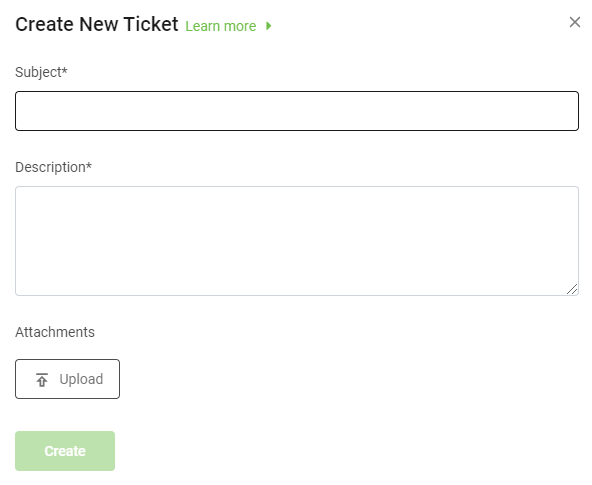
- On the Support page, select Create New Ticket.
- In the Create New Ticket dialog, enter the following:
- Subject: Enter a subject for the support ticket. This is a mandatory field.
- Description: Enter the ticket details. This is an optional field that allows you to describe the problem summary.
- Attachments: Add documents that provide more details about the issue. The file size must not exceed 4 MB. Select Upload and choose the file from the desired location to upload an attachment, then select Open.
After the file is uploaded, it is listed under Attachments. To remove the attachment, select the x to the right of the file name.

- Select Create.
The new ticket displays in the ticket listing table.
Editing a ticket
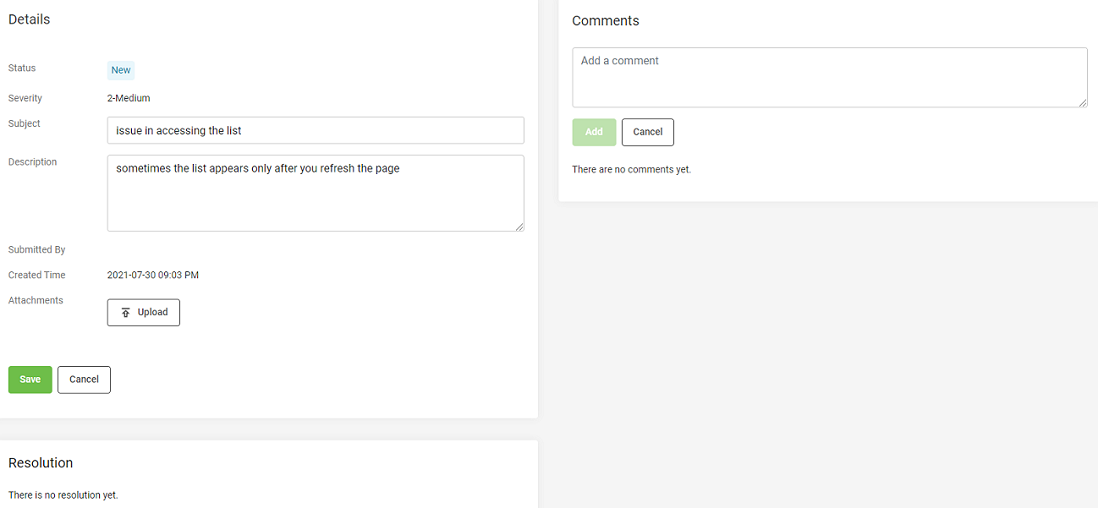
You can edit new and in progress tickets. Editing a ticket allows you to edit or add to the problem summary, description, customer name, and attachments.
To edit a ticket:
- On the left-hand menu, select Support.
- In the ticket listing table, select a ticket number to edit that ticket.
- On the Details pane, select Edit.
- Edit any of the following fields:
- Subject
- Description
- Attachments: You can add new attachments, but you cannot delete attachments that were previously added.
- Add New Comment
- To add comments, select Add New Comment.
- Enter a comment and select Add.

- Select Save.
Viewing ticket details
To view a ticket:
- On the left-hand menu, select Support.
- On the Support page, select the ticket number to view its details.
Service availability
The Lyve Cloud availability in the following image shows the calculated service availability for the month.

Lyve Cloud service availability is calculated by subtracting the error rate from 100% within a five-minute interval. If a customer does not make any requests in a 5-minute interval, that interval is assumed to have an error rate of 0%.
The error rate is the total number of errors returned, divided by the total number of requests during that 5-minute interval.
Error rate = number of errors ÷ number of request
Availability = 100% - error rate