このコンテンツは役に立ちましたか?
どうすればこの記事をもっと役立つものにできると思いますか?
Data Migration with Storage DNA Fabric
StorageDNA Fabric (SDNA) is enterprise data management software that consists of a controller and data managers. Both components can be deployed locally or in the cloud on physical or virtual Linux computers. One of its features is Cloud-to-Cloud data migration.
This topic covers migrating data from Azure Blob Storage to Lyve Cloud via the SDNA Fabric Object Migration feature. In this section, Azure Blob Storage is considered as one of the examples from various storage providers. Some of the steps may differ slightly depending on the source cloud provider. However, the overall process will be the same.
To migrate the data you need to:
- Create a configuration
- Create pools
- Create a project
- Run the project
Create a configuration
You must create source and target configurations for the cloud providers. In this case, we have Microsoft Azure as a source cloud provider and Lyve Cloud as a target cloud provider. You can attach more than one bucket to the configuration.
Pre-requisites for Microsoft Azure and Lyve Cloud
Before you start to configure the source for Microsoft Azure, ensure the following:
- Log in to your Azure portal and Lyve Cloud console.
- Copy the secret and access key value. These keys are required for source and target remote configurations.
- Microsoft Azure: Locate your storage account in Microsoft Azure and copy the value from the Key1 field under Access Keys.
- Lyve Cloud: Copy the following:
- Access key and Secret key: For more information, see Creating service accounts
- Bucket S3 endpoint URL: The endpoint is a URL specific to the bucket region.
In this case, the bucket is in the US west region so the endpoint is https://s3.us-west-1.lyvecloud.seagate.com. For more information, see Editing bucket properties.
- Region: For more information, see S3 API endpoints
Source remote (Microsoft Azure) configuration
To manage your remote configurations:
- Log in to DNA Fabric using credentials and then select Settings.
- In Remote Configurations, select Add to add a new remote configuration:
- Select a provider from the drop down, for example, Microsoft Azure.
- Enter the Config Name.

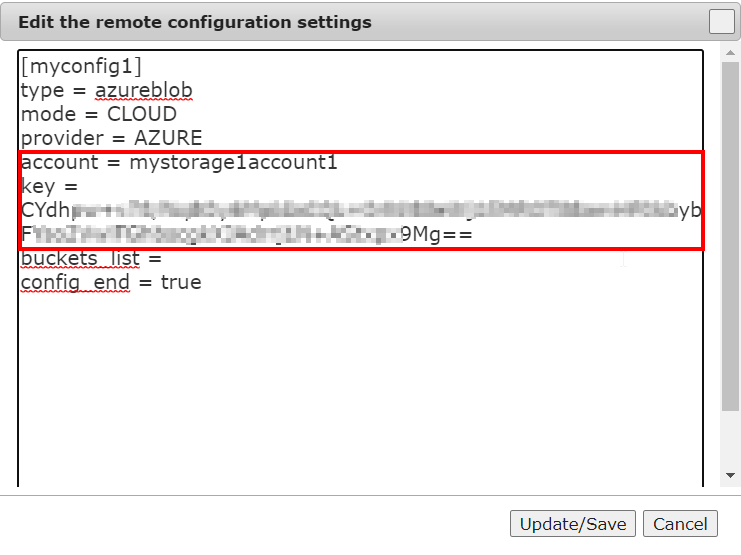
- In the dialog, update the following:
- account: Microsoft Azure account name
- key: Microsoft Azure account access key. To locate the access key, see Pre-requisites for Microsoft Azure and Lyve Cloud.

Target remote (Lyve Cloud) configuration
- Follow the first two steps as mentioned in Source remote configuration.
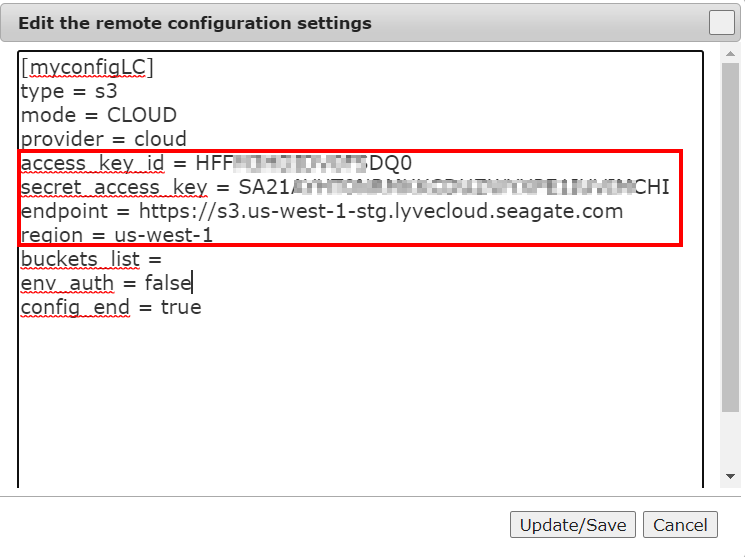
- In the dialog, update the following:
- Access key
- Secret Key
- Endpoint
- Region

Create pools
Pools are created to migrate data from one cloud to another. You must create a remote pool for source and target providers before creating a project.
One pool for source and target allows you to migrate objects for that bucket (container), so if there are more buckets to migrate, you must create a source and target pool for each bucket.
For example: If there are four buckets (B1, B2, B3, B4) in Microsoft Azure and you want to migrate all four buckets to Lyve Cloud. In this case, you must create four pools for the source and four pools for the target. In each pool, you select the configuration and select the buckets available for the configuration.
To create pools:
- Select the Pools tab.
- For Project Type, select Object Migration.
- For Pool Type, select Remote Sources.

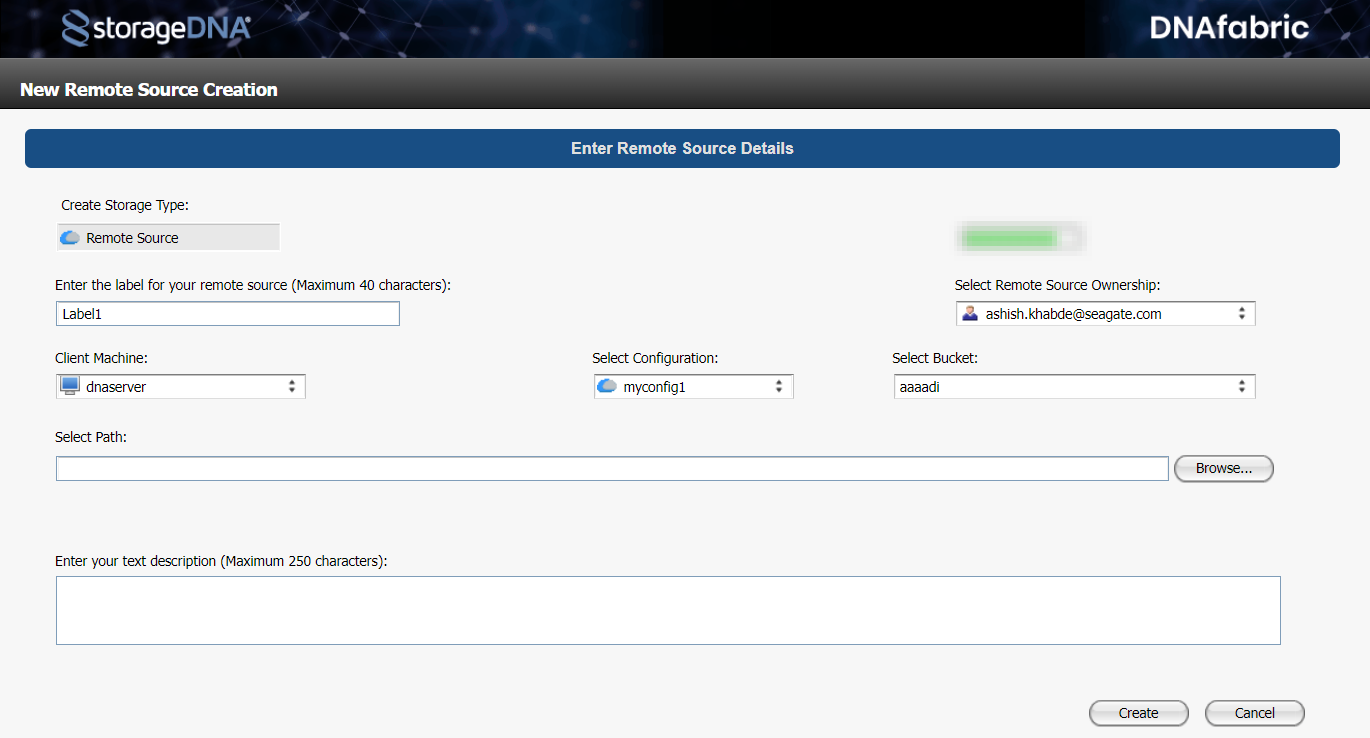
- Click + to create a new storage object. Enter the following:
- Label of remote source: Enter name of the remote source. This label appears on the project selection screen.
- Client Machine: Select the client machine.
- Select Configuration: Select the configuration of the source cloud. For information on source configuration, see Creating configuration.
- Select Bucket: Choose the bucket to migrate data. The bucket list displays all the buckets (containers) available in Microsoft Azure.

Create a project
Migration is conducted by defining projects. When creating a project, you specify the source and target with buckets or sub-folders, also called a prefix in S3 terminology.
You must create different projects if more than one bucket is required to migrate.
For example, if you have two buckets (B1 and B2) in Microsoft Azure that you want to migrate separately in Lyve Cloud, you must create two projects. Each project has one source and one target bucket attached. Once the project is created, you must run this project to start the migration.
To create a project:
- In the Projects tab, select + to create a new project.
- In the project creation wizard, select the required option and click Next.
- In the Workflow filter, select Data Mobility and Cloud Object and Multi-Site Workflows. Select Object to Object Replication for Backup, Archieve, Sharing from the list.

- In The Basics section:
- Enter the name of your project.
- Select the owner of the project from the list.
- Enter the project description.
- In the Source Machine section:
- Select the source and target machine.
- Select your disk source and cloud target from the list.
Click Next.
- Enter the credentials to complete the job creation on the selected system. Select Finish.
After the project is created it appears in the list of projects in central projects.
Run the project
You must run a project manually. Specify the source data within the source bucket container.
To manually run the project:
- In the Projects tab, select the project you want to run.
- Select Store, and verify the Store Job Summary and Folder Selection before you start running the job.
If you want to migrate the entire source bucket in Add Folder, specify / as source data. If you want to migrate one or more subfolders within this bucket, specify the subfolder names.
- In the Action Toolbar, select Start Job to manually run the job.

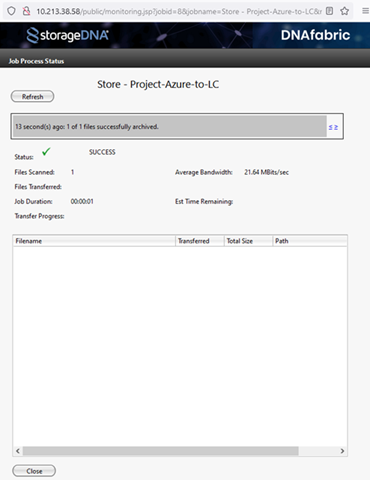
- The Job Process Status diaglog displays the status of the project where the running job can be monitored.
After the job is complete, you can view the contents of any S3 client in the target bucket. The data remains in the same format as within the source bucket.
