このコンテンツは役に立ちましたか?
どうすればこの記事をもっと役立つものにできると思いますか?
Storage

The information below identifies and explains the functions on the Storage page. For directions on how to configure RAID for your NAS OS device, go to RAID modes.
NAS OS volume and RAID management
NAS OS supports multiple volumes, each with its own level of RAID. The maximum number of supported volumes depends upon the amount of disks in the NAS's enclosure. For example, a NAS OS device with eight hard drives can have up to eight volumes.
Enhanced data protection: NAS OS SimplyRAID
No matter the capacity of your disks, NAS OS SimplyRAID will prepare the storage for immediate use as well as future expansion. SimplyRAID allows you to:
- Install disks of varying capacities
- Replace smaller capacity disks with larger capacity disks
- Upgrade storage capacity without deleting or moving data
- Protect data without compromising performance
When using disks of varying capacities, SimplyRAID will attempt to optimize available storage for your data.
Standard disk configuration: Manual RAID
While the benefits of SimplyRAID are highly recommended, the Storage page also gives you the option to manually configure your hard disks as:
- JBOD
- RAID 0 (minimum two disks)
- RAID 1 (minimum two disks for data protection)
- RAID 5 (minimum three disks)
- RAID 5 plus spare (minimum four disks)
- RAID 6 (minimum four disks)
- RAID 6 plus spare (minimum five disks)
- RAID 10 (minimum four disks)
Storage overview
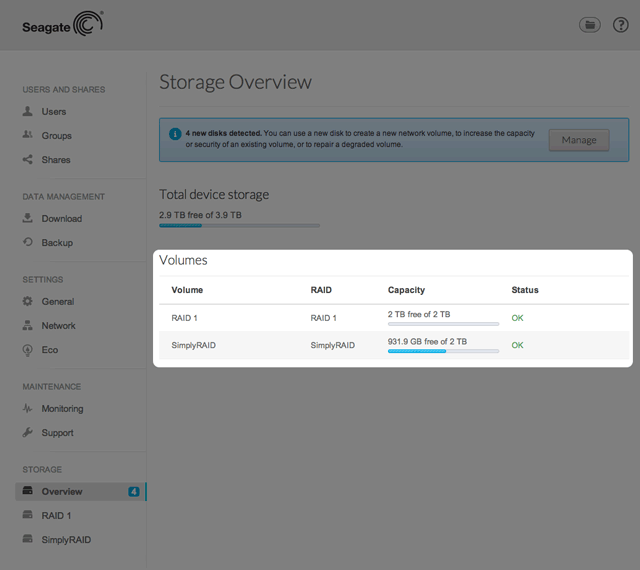
Choose Storage > Overview on the NAS OS home page to:
- Review the list of the NAS's volumes and their current state.
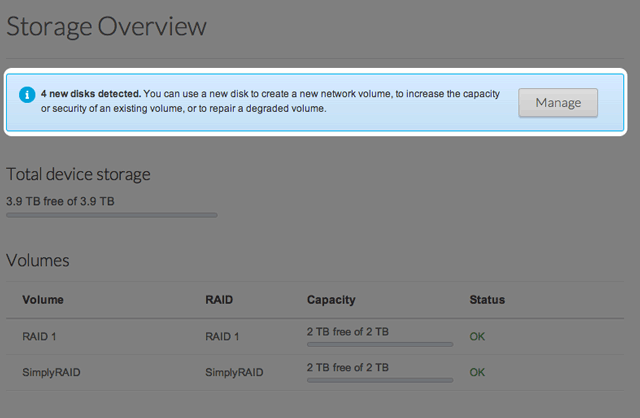
- Configure new disks added to the NAS.
Add storage
Choose Manage to create a new volume. For further information, see RAID Modes.

Select a volume

To manage the settings for a volume on the NAS:
- Choose Storage > Overview on the NAS OS home page.
- Choose the volume.
Volume tools

Tools to manage the selected volume are available on the volume's page.
Name
The default name for the first new volume is Volume 1. The number will rise incrementally when adding new volumes, Volume 2, Volume 3, etc. To change the name:
- Pass the cursor over the name of the volume and choose the configuration icon (pencil).

- Type the new name.

- Choose Save.
Manage

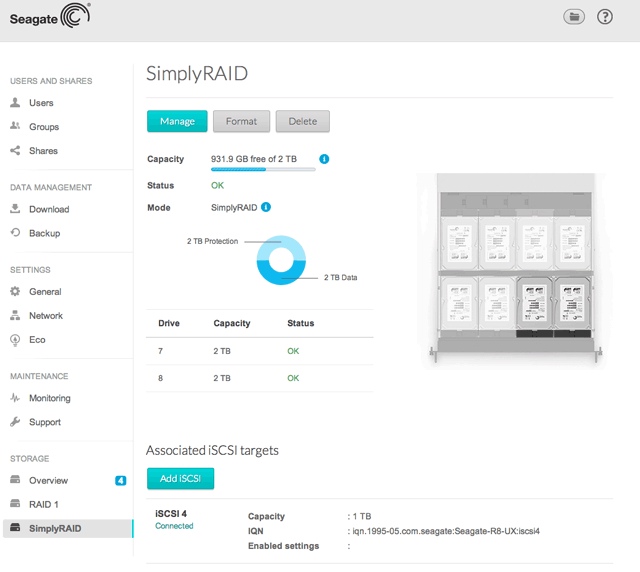
You can perform the following on a volume using Manage:
- Add disks to the volume
- Add a spare disk to the volume
- Create an iSCSI target on the volume (see iSCSI Target)
- Repair
- Expand storage capacity
- Upgrade from single-disk security to double-disk security
Format
Select Format to delete all shares and data on the volume. Make certain to back up your data before choosing Format.
Though data is deleted, the RAID configuration for the volume will remain intact. Since you do not have to rebuild the RAID, this is a good alternative to Delete when you want a simple option to deleting all data on the volume.
Delete
Choosing Delete will DELETE THE VOLUME AND ALL OF ITS ASSOCIATED SHARES AND DATA. Use the Delete button only if you intend to recreate the RAID from scratch and/or add disk(s) to another volume.
Capacity
A quick reference of the volume's:
- Total storage capacity.
- Available storage capacity.
An i tooltip will appear in the row for capacity following the creation of an iSCSI target. Pass the cursor over the tooltip to view the amount of storage assigned to the volume's iSCSI target.
Status
Status gives you immediate feedback on the health of the volume's RAID configuration:
- OK. The RAID is operational and no problems have been detected.
- No data protection. Data on the volume is intact but the RAID is in danger of breaking since one or more disk(s) are missing or reporting errors. The amount of disks that can fail before this message appears is contingent upon the level of RAID.
- Protected if one disk fails. RAID configurations with double-disk security will see this message if a single disk is missing or reporting errors.
- Broken. The RAID is broken resulting in a loss of data.
- Synchronizing. The system is synchronizing data across all the disks selected for the RAID configuration.
- The volume is available for use while the RAID is synchronizing but NAS performance may be affected.
- RAID data protection will be available once the synchronizing is complete.
- Choose the tooltip next to Synchronizing for details on its progress.
Mode
Mode lists the level of RAID configured for the volume. Pass the cursor over the tooltip for details on the RAID's level of data protection.
Storage graph
A multicolor circle shows how the RAID distributes the volume's storage.
- Dark blue: Storage capacity for your data.
- Light blue: Protection in case one or two disks fail. The light blue indicator will vary in size depending upon single or double disk protection.
- Green: Disk capacity that spans beyond the level of RAID. This space is reserved for expansion should you add new or, larger capacity disks.
Factors that determine the storage capacities for data, protection, and expansion:
- The amount of disks in the enclosure
- The storage capacity of each disk (see note below on mixed capacities)
- RAID mode
- Single-disk or double-disk security
Examples:
- RAID 0 configuration with five disks. The only color is dark blue for data capacity since RAID 0 has no protection
- SimplyRAID configuration with two disks of equal capacity. Dark and light blue for data and protection, respectively.
- RAID 6 configuration with five disks of mixed capacities. All colors are represented since the RAID 6 uses double-disk security and the disks are of mixed capacities.
Volume list and dynamic photo
Review the disks' capacities and status. The dynamic photo of the NAS highlights:
- The disks associated with the volume
- New disks available for a new or existing volume
- Empty slots available for expansion
- Failed or missing disks