¿Le pareció útil este contenido?
¿Cómo podríamos hacer que este artículo sea más útil?
Volume Expansion: Single-Disk And Unprotected Volumes
Review the information below before attempting to add disks to single-disk and unprotected volumes.
Important info on NAS Backup: It is recommended that all users back up data to DAS or another NAS as further protection against disk failure or secondary points of failure (e.g. hardware, network, etc.). See Backup Jobs for details.
Removing healthy disks from an unprotected volume
An unprotected volume can be:
- SimplyRAID single-disk
- RAID 1 single-disk
- JBOD
- RAID 0
Removing a healthy hard disk from an unprotected volume while the NAS OS device is powered on will delete all of the volume's data. While removing healthy disks is not recommended, you can avoid losing data by shutting down the NAS first. Return the hard drives to their proper bays before powering on the NAS.
Additionally, powering on the NAS with a missing disk in an unprotected volume will break its RAID and all data will be lost.
Volume expansion
Consider the following before adding disks to a RAID volume:
- Apart from RAID 0, RAID volumes can be expanded with new disks. However, it is not possible to add new disks with inferior capacities. For example, a RAID 5 or SimplyRAID volume with three 2TB disks supports the addition of a fourth disk that is 2TB or higher. NAS OS will alert you if a disk cannot be added to the volume.
- Volumes can be expanded by up to 8TB at one time. While you can expand a volume by more than 8TB, it must be done using multiple steps. For example, if you want to expand a 2TB volume with four 3TB drives, the expansion must be performed two times. That is, expand the volume with 6TB on the first pass and the remaining 6TB on the second pass.
- While a volume can be created with a very large capacity (see Maximum Elements by Feature), it cannot be expanded beyond 16TB. For example, a 14TB volume will not accept an additional 3TB for expansion. In such a case, back up the data from the volume that you want to expand to another volume or another storage device. When all the data has been backed up, delete the volume and create a new volume with the larger capacity.
Choose your RAID and follow the instructions on expanding the volume. RAID 0 does not support volume expansion.
SimplyRAID
- Go to NAS OS in an Internet browser and choose Storage>Overview. Important: Do not choose Manage on the Storage Overview page.
- On the Storage Overview page, click on the volume that you want to expand. The volume's storage page will load in the browser.
- Choose Manage.
- Choose Add drive and Next.
- In the Select disks window, disks with white checkboxes can be selected to expand the volume. Disks with grey checkboxes are being used by an existing volume and cannot be selected. Select the box under each disk that you want to use to expand the volume and choose Next. Important: All data on the disks that you select will be deleted.
- Review the summary and choose Finish. A popup window cautions you that all data on the selected disks will be deleted. Choose Yes to continue.
You can use the volume during the RAID synchronization.
RAID 1
When adding a disk to a RAID 1 volume, you can:
- Increase security to protect data
- Change the RAID to SimplyRAID (Important: Data stored on the volume will be deleted to accommodate the change in RAID.)
- Go to NAS OS in an Internet browser and choose Storage>Overview. Important: Do not choose Manage on the Storage Overview page.
- On the Storage Overview page, click on the volume that you want to expand. The volume's storage page will load in the browser.

- Choose Manage.

- Choose Add drive and Next.

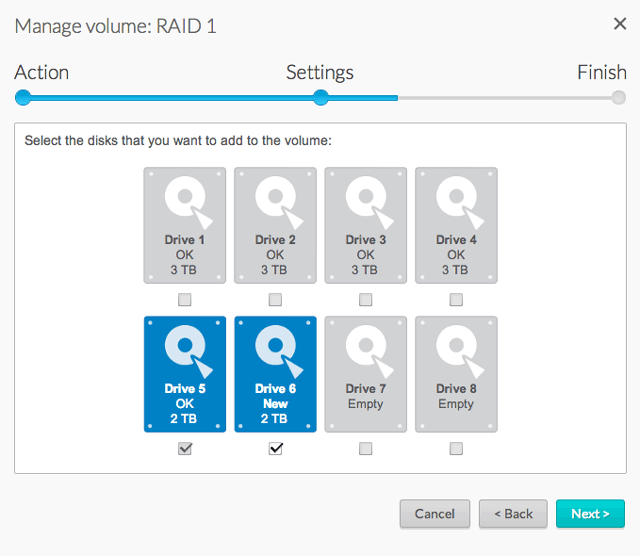
- In the Select disks window, disks with white checkboxes can be selected to expand the volume. Disks with grey checkboxes are being used by an existing volume and cannot be selected. Select the box under each disk that you want to use to expand the volume and choose Next.Important: All data on the disks that you select will be deleted.

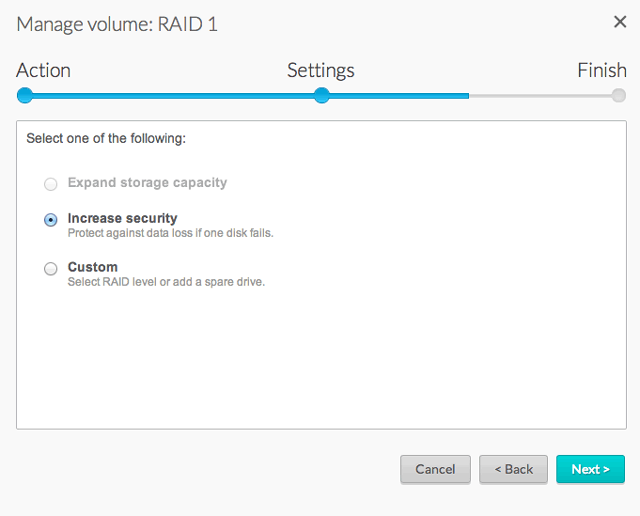
- Select:
- Increase security to enable protection on the RAID 1 volume.

- Custom to change the RAID to SimplyRAID. Important: Data stored on the volume will be deleted to accommodate the change in RAID.
- Increase security to enable protection on the RAID 1 volume.
- Choose Next.
- Review the summary page then choose Finish. A popup window cautions you that all data on the selected disks will be deleted. Choose Yes to continue.

You can use the volume during the RAID synchronization.
JBOD
- Go to NAS OS in an Internet browser and choose Storage>Overview. Important: Do not choose Manage on the Storage Overview page.
- On the Storage Overview page, click on the volume that you want to expand. The volume's storage page will load in the browser.
- Choose Manage.
- Choose Add drive and Next.
- In the Select disks window, disks with white checkboxes can be selected to expand the volume. Disks with grey checkboxes are being used by an existing volume and cannot be selected. Select the box under each disk that you want to use to expand the volume and choose Next.Important: All data on the disks that you select will be deleted.
- Review the summary page then choose Finish. A popup window cautions you that all data on the selected disks will be deleted. Choose Yes to continue.