此內容是否有幫助?
本公司能如何讓本文更有幫助?
iSCSI Network Setup for Windows
Small Computer System Interface (SCSI) is a widely used protocol for controlling direct attached storage devices. Internet SCSI (iSCSI) uses the SCSI protocol on network volumes. iSCSI works on top of the Transport Control Protocol (TCP) and allows SCSI commands to be sent through a local area network (LAN), wide area network (WAN), or the internet.
Your iSCSI network requires four components:
Data network—iSCSI requires an IP-based network for data transport between systems with initiators (servers) and targets (storage volumes or arrays).
Management network—A computer connected to the appropriate Ethernet management port on the back of Rackmount Receiver. Use the Ethernet port that matches the slot with the Lyve Mobile Array in order to manage the storage. A computer with Lyve Client software must be connected to the same management network to configure the applicable iSCSI ports.
iSCSI target—The target is a storage volume or array connected to the network. In the following instructions, the iSCSI target is a volume in a Lyve Mobile Array inserted in a Lyve Mobile Rackmount Receiver.
iSCSI initiator—The initiator is the software component residing on a server that is configured to connect to an iSCSI target. By using an iSCSI initiator, target volumes can be mounted on a server as if they were local volumes.

Requirements
Hardware
Host connection
- Windows PC host computer with Windows 10 Pro, Windows 11 Pro, Windows Server 2019 or higher.
- iSCSI host connection with assigned addresses and on the same data network/subnet as the target iSCSI ports on Lyve Mobile Rackmount Receiver. If the host and target connections are not on the same network/subnet, your network infrastructure must be capable of routing and managing traffic between subnets. Note that for optimal performance, the host connection should have a transfer rate that matches the target connection ports.
- Ethernet (copper cat5e and above)/SFP+ (optical) cables supporting the host and target data connection ports. Use the correct cables for your environment.
Target connection
- Rackmount Receiver with iSCSI 25Gb 4-port 10Gb (SFP+) or iSCSI 10GbaseT 2-Port (RJ45) ports connected to the data network.
- Ethernet cable connecting the management network to the appropriate Ethernet management port (Slot A or B) on the back of Rackmount Receiver.


Software
- The Lyve Client Software app installed on a computer connected to the management network.
Network protocols
Service Location Protocol (SLP)
The Lyve Client app relies on the Service Location Protocol (SLP) to discover Lyve Mobile devices on the network.
For automatic detection, the following is required:
- SLP broadcast messages using UDP port 427 must be allowed in the network environment.
- IP assignments to all computers and devices are performed by a DHCP server on the network.
- The computer running Lyve Client and Lyve Mobile Rackmount Receiver's Ethernet management port must be connected to the same subnet.
If your company's IT policies prevent SLP network broadcasting, you can use other methods for detecting the device in Lyve Client. See Alternative methods for device detection below.
Setup overview
Setting up the connection between Lyve Mobile Rackmount Receiver’s ports and the host computer requires three steps:
- Set up the IP addresses for Lyve Mobile Rackmount Receiver’s iSCSI ports.
- Set up the iSCSI initiator/target(s).
- Map the iSCSI initiator to iSCSI target(s).
Pre-setup
Before beginning the configuration, make sure the Lyve Client app is installed on a computer connected to the management network. See the Lyve Client Software User Manual for installation details.
- Insert Lyve Mobile Array into slot A or B on Lyve Mobile Rackmount Receiver. Be sure to select the correct slot for the iSCSI connections behind Rackmount Receiver.

- On the host computer, open the Lyve Client app.
The LED on the device inserted in Lyve Mobile Rackmount Receiver blinks white during the boot process and turns solid orange. The solid orange LED color indicates the device is ready to be unlocked.
The host computer will automatically unlock the device if it was connected to Lyve Mobile Array in the past and is still authorized for security. If the host computer has never unlocked the device, you will need to enter your Lyve Management Portal username and password in the Lyve Client app. See Setup Requirements in the Lyve Mobile Rackmount Receiver User Manual.
Once Lyve Client has validated permissions for the device connected to the computer, the LED on the device turns solid green. The device is unlocked and ready for use.
Set up IP addresses for Lyve Mobile Rackmount Receiver iSCSI ports
- On the computer connected to the management network, open the Lyve Client app.
The iSCSI setup sequence can be initiated from the Activity or Devices screen.
Activity—An iSCSI Setup notification informs you that a setup is required.

Devices—The status indicator on the Device card informs you that a setup is required.

- Click on the Activity or Devices tab.
- Locate the card indicating the Lyve Mobile Array connected to the Rackmount Receiver's iSCSI ports. Click on the Setup icon.
![]()
- The port indices listed in the dialog match the port labels on the iSCSI FRAM on the back of Rackmount Receiver. Enter the IP address, subnet mask, and default gateway for each port.

- Exceeds a permitted range (for example, entering a value greater than 256).
- Results in IP address/default gateway addressing inconsistencies not permitted by the defined subnet mask.
- Results in ports with identical IP addresses.
- (Optional) Select checkboxes under Advanced Settings to enable any of the following:
-
- Jumbo Frames—Allows for improved network speed for networks configured to support Jumbo Frames.
- CHAP (Challenge Handshake Authentication Protocol)—Enables users of network-mounted volumes to identify themselves to an authenticating system without exposing their password. See Managing CHAP records below.
- iSNS (Internet Storage Name Service)—Allows automated discovery, management and configuration of iSCSI devices by networks using iSNS management services. See Designating iSNS servers below.
- Click Apply.
Managing CHAP records in Lyve Client
To create a new CHAP record:
- In the 'Configure iSCSI connection' dialog, check the Enable CHAP (Challenge Handshake Authentication Protocol) checkbox.
- Select Create a new record from the dropdown menu.
- In the Name field, you'll see a default iSCSI Qualified Name similar to: iqn.1995-03.com.dothill:01.array.00c0fff3920c. Leave as is.
- In the Secret field, enter a password (must be 12-16 alphanumeric characters).
- Click Save.
Only the name is copied to the user's local database. The name and secret are stored on the device itself, so that the secret is not revealed to the host system.
To edit a CHAP record:
- Select an existing CHAP record from the dropdown menu.
- Edit the Name and Secret for the record.
- Click Save.
To delete a CHAP record:
- Select an existing CHAP record from the dropdown menu.
- Click Delete.
- Confirm that you want to delete the record.
Designating iSNS servers in Lyve Client
The Internet Storage Name Service (iSNS) manages multiple iSCSI targets on a network. Certain iterations of Windows Server include the iSNS feature. Using an iSNS can save time for each iSCSI initiator. For example, rather than searching the network for an iSCSI target, the initiator can look for a connection in a single location, the iSNS server. The iSNS server keeps tabs on all the iSCSI targets on the network, thus allowing the initiator to connect to one that is available.
Configure iSNS on your network server and then review the instructions below to add your iSCSI target in Lyve Client.
To designate iSNS servers:
- In the 'Configure iSCSI connection' dialog, check the iSNS (Internet Storage Name Service) checkbox.
- Enter the iSNS IP Address of the primary server.
- (Optional) Enter the iSNS Alternate IP Address of a secondary server.
Set up the iSCSI initiator/target(s)
A data path must be established connecting the network server’s iSCSI ports to the target iSCSI ports on Lyve Mobile Rackmount Receiver.
Specify iSCSI initiator
- On a workstation used to manage the network server, open the Server Manager app.
- Open the Tools menu and select iSCSI Initiator.
- In the 'Microsoft iSCSI' dialog, click Yes to run the iSCSI service.
- The 'iSCSI Initiator Properties' window opens. Click on the Discovery tab, and then click on the Discover Portal... button.

- Enter one of the IP addresses for the iSCSI ports on Rackmount Receiver.
- Click on the Advanced... button.
- On the Advanced Settings screen:
- For the Local adapter, select Microsoft iSCSI Initiator.
- For the Initiator IP, enter one of the IP addresses for the host connection.
- (Optional) If you set up Challenge Handshake Authentication Protocol (CHAP) for the target device (see Managing CHAP records in Lyve Client above), click the Enable CHAP log on checkbox. Enter the Target secret (the 12–16-character password created in Lyve Client) for the target device.
- Click OK to close dialogs.
Specify iSCSI target(s)
- Click on the Targets tab.
- Select a target from the list of discovered targets and click Connect. (If you do not see the target you are looking for, click Refresh.)
- In the 'Connect To Target' dialog, the target name is pre-populated. Proceed with the following:
- Ensure that Add this connection to the list of Favorite Targets is checked.
- (Optional) If multiple adapters are plugged into the same network or multiple routes exist to the target, check Enable multi-path.
- Click the Advanced... button.
- For the Local adapter, select Microsoft iSCSI Initiator.
- For the Initiator IP, select an IP address for the host connection.
- For the Target portal IP, select an IP address for the target connection.
- (Optional) If you set up Challenge Handshake Authentication Protocol (CHAP) for the target device (see Managing CHAP records in Lyve Client above), click the Enable CHAP log on checkbox. Enter the Target secret (the 12–16-character password created in Lyve Client) for the target device.
- Click OK to close the dialog.
- Confirm that the status of the target in the 'Discovered targets' list is 'Connected'.
- Repeat steps 2-4 for each additional server IP address on the Data network.
Map the iSCSI initiator to the iSCSI target
To complete the mapping of the initiator to the Lyve Mobile Array volume, the Lyve Client app must be refreshed.
- On the workstation used to manage Lyve Mobile devices, open the Lyve Client.
- Click on the Devices tab.
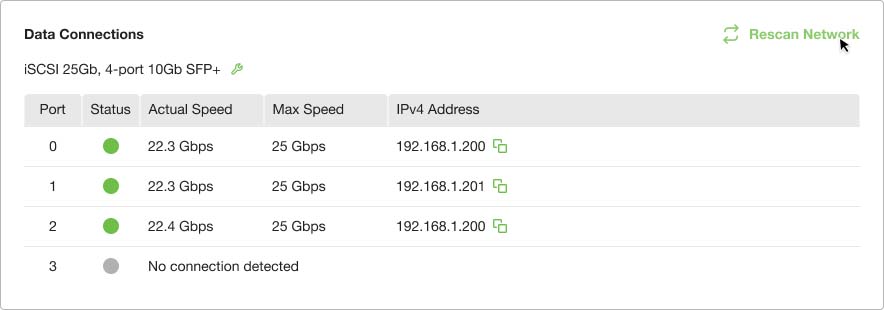
- In the Data Connections section, click Rescan Network.
Alternative methods for device detection
The Lyve Client app relies on the Service Location Protocol (SLP) to discover Lyve Mobile devices on the network. If your company's IT policies prevent SLP network broadcasting, you can use other methods for detecting the device in Lyve Client.
Method 1: Direct connection
Lyve Client can auto-detect the Lyve Mobile Array if the computer is connected directly to Lyve Mobile Rackmount Receiver.
- Connect the computer directly to the appropriate Ethernet management port on the back of Rackmount Receiver. Use the Ethernet port that matches the slot with the Lyve Mobile Array.
- On the host computer, open the Lyve Client app.
- Click on the Devices tab to see the detected device.
Method 2: Add device manually
To manually add the device in Lyve Client, you'll need to do the following:
- Obtain the device connection details using a network scanning tool. See one of the following below:
- Obtain device connection details with OpenSLP
- Obtain device connection details with arp
- Manually add the device.
- See Add the device in Lyve Client below.
Obtain device connection details with OpenSLP
Note: Installing and running OpenSLP requires administrative rights for the host computer.
- Install OpenSLP from http://www.openslp.org/ (Mac or Windows). The slptool command is only available with a custom install and selecting the "test tools" option. (Alternatively, you can download the source code and build the tools.)
- Run the following command:
slptool findattrs service:ui:ssh
If a Lyve Mobile Array is detected, attributes similar to the following will be listed:
C:\Program Files\OpenSLP>slptool.exe findattrs service:ui:ssh
(x-system-name=Lyve Mobile Array),(x-system-location=Uninitialized Location),(x-system-contact=Uninitialized Contact),(x-system-information=Uninitialized Info),(x-scsi-vendor-id=SEAGATE),(x-scsi-product-id=3035),(x-vendor-name=""),(x-product-id=3035),(x-product-brand=""),(x-ip-addresses=169.254.100.123),(x-midplane-serial-number=00C0FFF3907C),(x-product-serial-number=00000000),(x-bundle-version=M100R001),(x-build-date=2021-11-22T22:38:12Z),(x-platform-type=HARDWARE_PLATFORM_TYPE_INDIUM),(x-wwnn=208000c0fff3907c),(x-mac-address=00:C0:FF:F3:90:7C),(x-top-level-assembly-part-number=Not Present),(x-top-level-assembly-serial-number=Not Present)
Obtain device detection details with arp
- Enter Command Prompt in your Windows search bar and select the Command Prompt app.
- Enter arp –a and press Enter.
- Filter the list to find a MAC address starting with 00:C0:FF:F3:9.
Add the device in Lyve Client
- Obtain device connection details using a network scanning tool (see above).
- Click on the Devices tab.
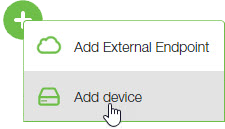
- Click on Plus icon and select Add Device.
- If DHCP is available, enter the IP address automatically assigned to the device. If DHCP is not available, enter a static IP address or the default/fallback address.
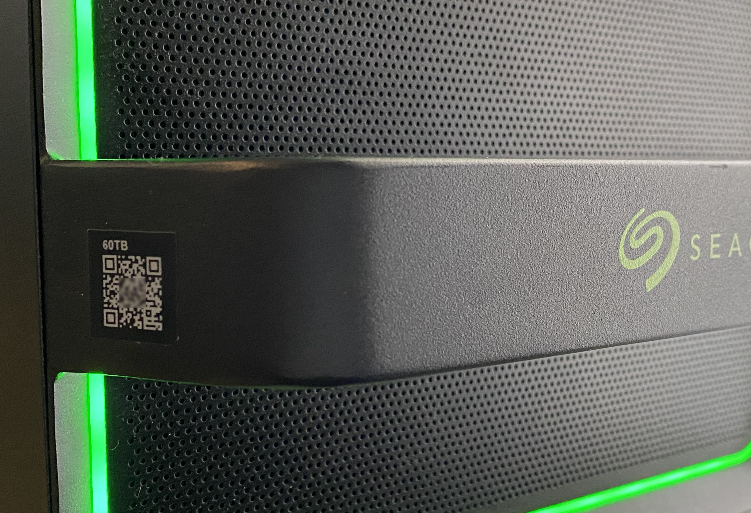
- Enter the serial number for the Lyve Mobile Array in the Lyve Mobile Rackmount Receiver slot. If you don't know the serial number, you can find it by scanning the QR code on the left side of the Lyve Mobile Array handle.
- Click Connect.
(Optional) Manual disk management instructions
Setting the volume to 'online'
If you need to set the volume to online:
- On a workstation used to manage the network server, open Computer Management.
- In the sidebar, click on Device Manager.
- Click on Disk drives and confirm that the Seagate drive is connected. If you do not see the Seagate drive, right-click on Disk drives and select Scan for hardware changes to refresh the list.
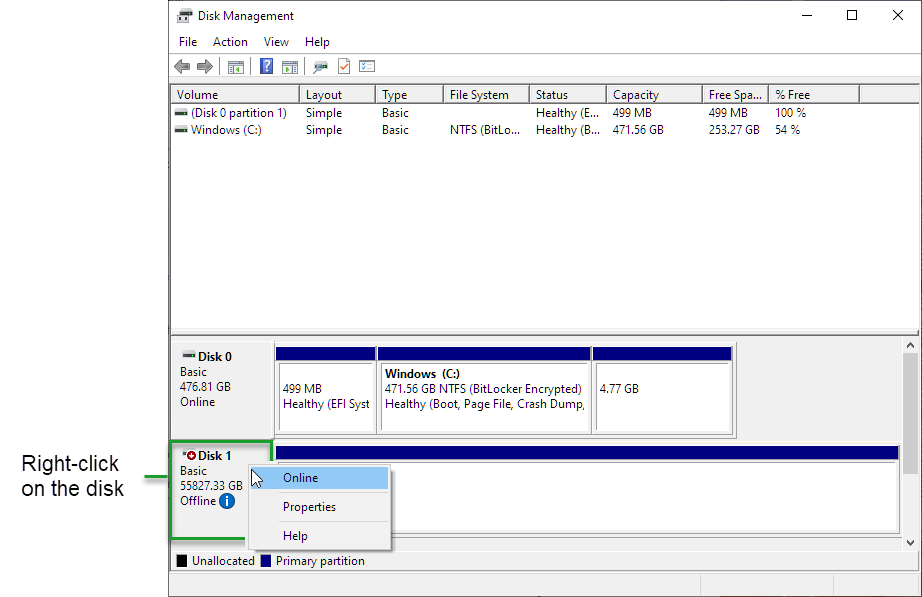
- In the sidebar, click on Disk Management.
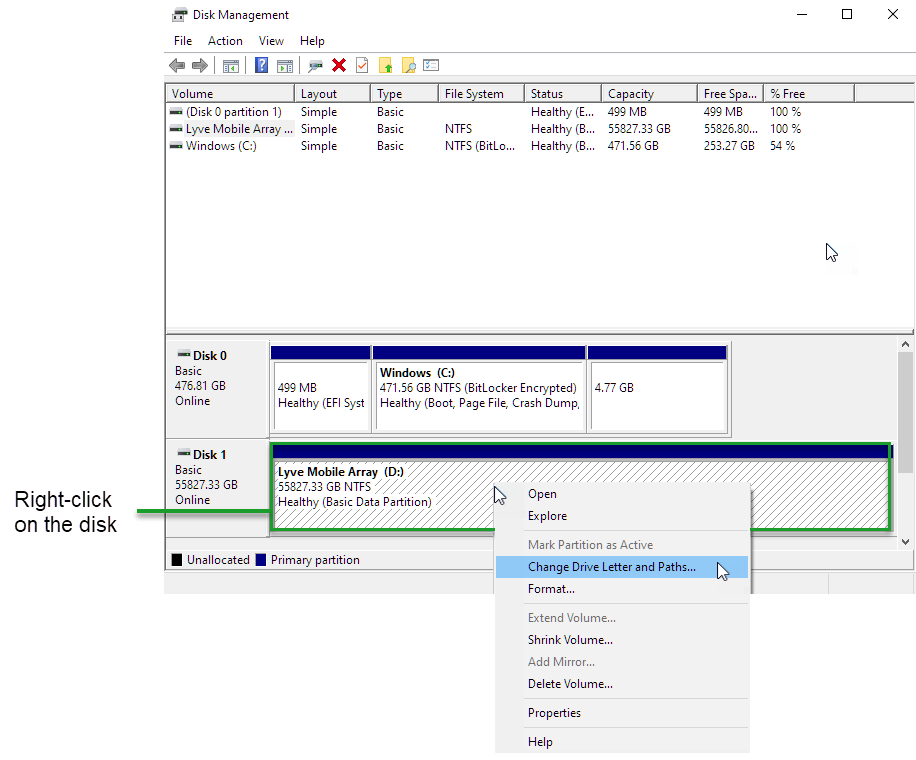
- Confirm that the disk is listed. Right-click on the disk on the left side of the screen and select Online.
Reassigning drive letter
If you need to reassign the drive letter associated with the disk, right-click on the disk details and select Change Drive Letter and Path.
Formatting the drive
- If you need to change the drive format, right-click on the disk details and select Format.

- Select the desired file system format.
- Click OK.